![]()
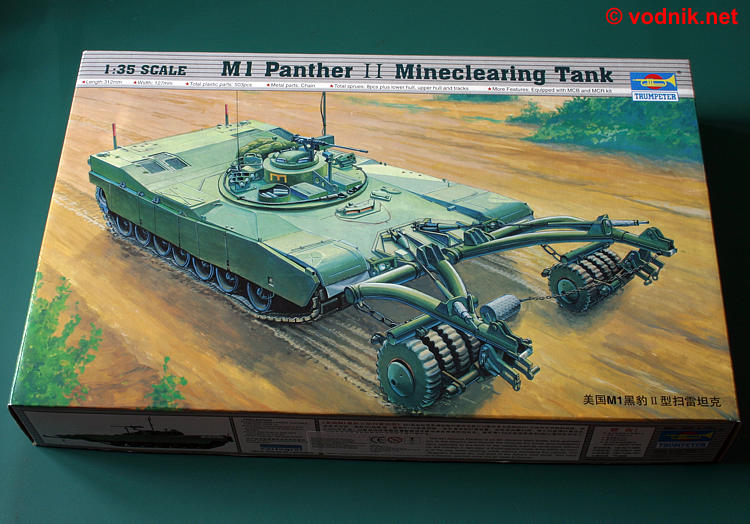
M1 Panther II
Mineclearing Tank
Trumpeter 00346
1/35
M1 Panther II is a M1 Abrams tank specially modified for mine clearing missions. This is quite new vehicle in US Army inventory, as first units were built in 1999. The concept of specialized mine clearing vehicle is relatively new in US Army - the first such vehicle, M60 Panther, was built just a few years earlier when it became clear that the operation of eliminating enormous number of mines left in Bosnia after the war, requires the use of such vehicle. The M60 based Panther was a success, but aging M60 hulls required a lot of maintenance and spare parts were becoming hard to find. Only six prototypes of M60 Panther were built. The Army decided to base the series production vehicle on old M1IP hulls - of which many remain in storage. Modifications include the removal of the turret and installation of mine clearing roller (MCR) or mine clearing blade ("mine plow" - MCB) on the front of the vehicle and Omnitech's Standardized Teleoperation System, which allows the vehicle to be remotely operated. M1 Panther II vehicles were used in Bosnia, and also in Iraq.
When Trumpeter and Dragon almost simultaneously announced plans to release M1 Panther II models in 1/35 scale it was quite a surprise. After all this is very "exotic" vehicle and it is hard to expect that it would sell in large numbers. On the other hand the modifications necessary to convert M1A1 models available from both manufacturers to M1 Panther II configuration are not large and the cost of developing a new kit was most likely relatively small. At least that was the case for Trumpeter kit, which was released first. This manufacturer already had MCR and MCB parts used in various Abrams kits, so all they had to do was to remove the turret from the M1A1 kit and replace it with newly designed Panther specific parts. Dragon had to design a new MCR (they already had MCB) and this could have been one of the reasons why their M1 Panther II model is not available yet. But the most important reason is that supposedly they decided to redesign the hull entirely and use only a minimum (if any) of parts from their old Abrams models. We have yet to see what the results of this work will be - right now the Trumpeter kit is the only M1 Panther II model available.
THE KIT
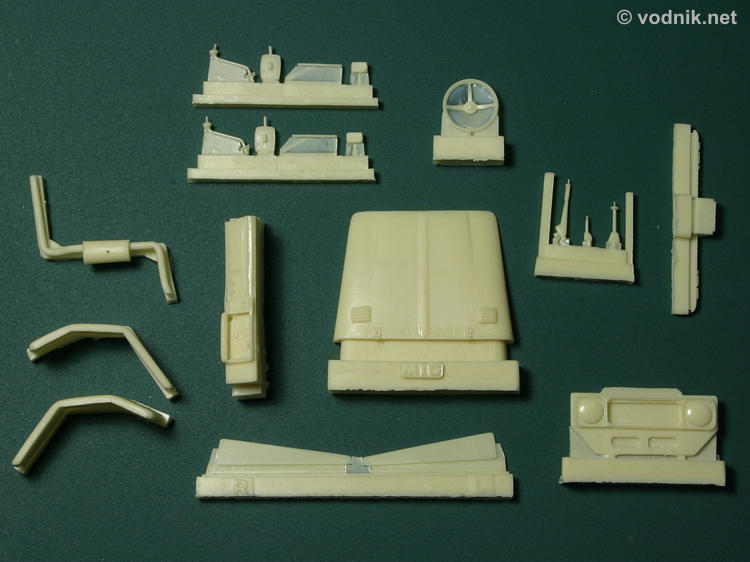
In the big and stiff cardboard box we get five sprues in olive green plastic, upper and lower hull parts in the same color, one sprue with link and length tracks in black plastic, small sprue of vinyl wheel hubs, a pair of vinyl one-piece tracks, an instruction booklet, decal sheet and two small plastic bags. In one bag is a length of chain, a piece of vinyl tubing and a copper wire. The other bag contains the length of white twine for tow cables and a piece of clear styrene sheet with the pre-cut periscope inserts. Of all there parts new are only instructions, decals and one parts sprue. All the rest was already used in other Abrams kits released by Trumpeter. The small decal sheet includes marking just for one overall forest green (not olive drab as indicated in instructions!) vehicle from 54th Engineer Battalion "Daggers" of 130th Engineering Brigade based in Bamberg, Germany. The instruction booklet shows the assembly in 13 steps for the vehicle, plus 9 steps for the MCB and alternatively also 9 steps for MCR. Exploded diagrams are very clear and additional comments in English and Chinese are added to them to help in assembly.
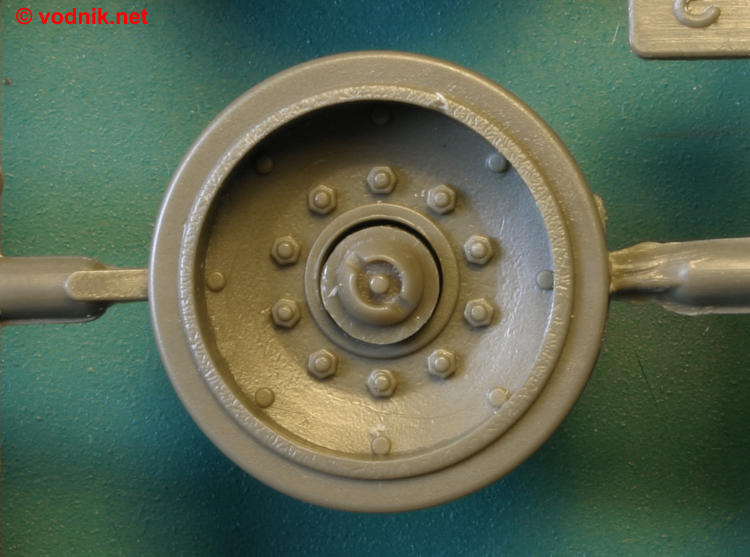
There is some flash on parts - not much, but above average. I also noticed slight misalignment of mold halves on some parts, what can complicate cleanup a bit. Surface details on parts are nice, although on most parts is rather on the soft side. Most ejector pin marks will be hidden after assembly, but there are some, particularly on MCB and MCR, which require attention and would have to be removed. I have not noticed any sink marks, but there are some other mold problems visible on a few parts - for example the bolts on one of the sprocket wheels are very poorly molded. The sprue attachment gates are quite big on some small parts and will require careful removal to avoid damaging parts.
The main hull parts are not attached to any sprue. Upper hull features nice non-slip surfaces and the engine deck is a separate part. Lower hull part has a motorization holes in it, as Trumpeter offered their M1 models also in such version, but there are plugs provided to cover them.
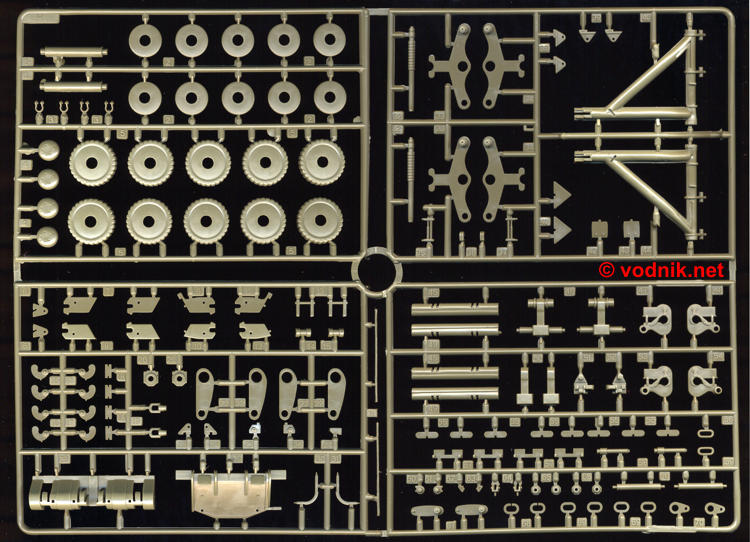
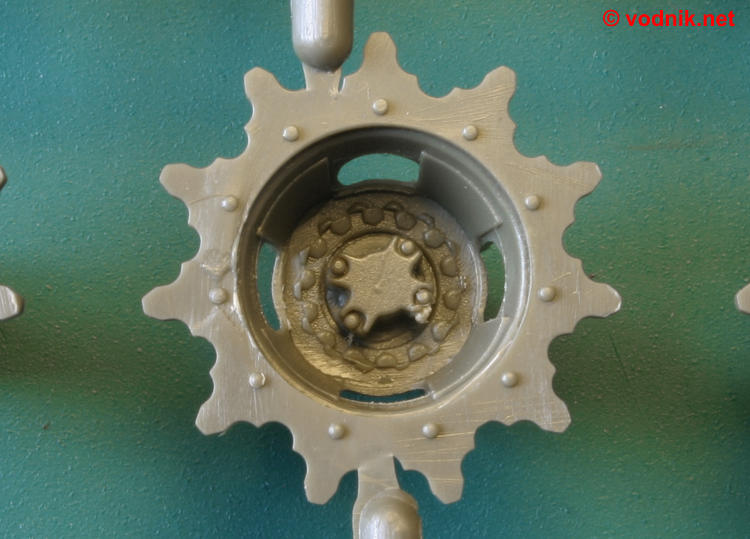
Sprue A contains suspension parts - wheels, suspension arms and final drive covers. Trumpeter M1 models are currently the only models of this tank in 1/35 scale with separate suspension arms. This means that with minimal effort it is possible to articulate the tank suspension - this is particularly useful feature for tanks equipped with MCB or MCR, such as Panther II, as in the real world the weight of these devices causes the noticeable forward tilt of the whole vehicle. Unfortunately while the separate suspension arms are one of the biggest advantages of Trumpeter Abrams models, their road wheels are the worst of their flaws. Trumpeter decided to use the system of attaching wheels to axles known among others from old Tamiya M60 kits and this means that the poly caps are not enclosed inside the wheel, but have wheel hub details molded on one side and are installed from the outside of the wheel. This inevitably leaves a visible gap around the vinyl wheel hub and depending on the used paint type may cause problems as vinyl is not as "paint friendly" as styrene.
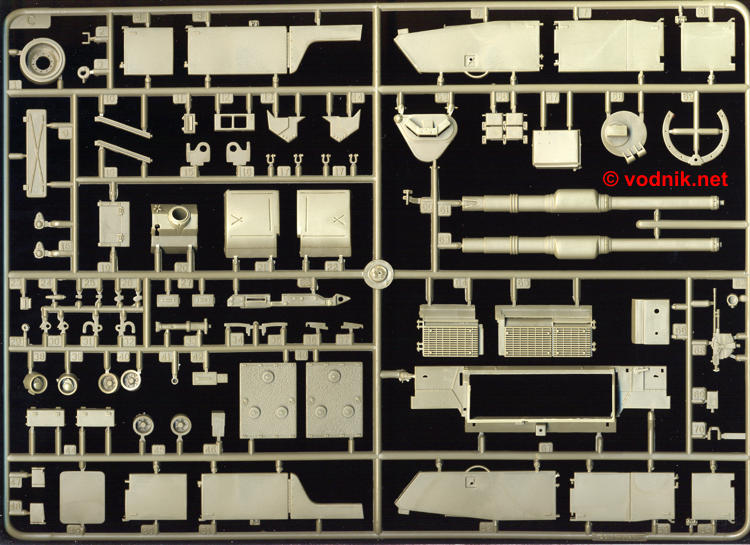
The C sprue contains various parts, of which significant amount is not used in this model. To the spare parts box we will be able to add a gun barrel with the mantlet, loader's hatch and machine gun, gunners sight box, blast panels and some other small parts designed to be attached to the turret of standard M1 tank. Parts usable in Panther II kit on this sprue include: side skirts, separate front fenders, driver's hatch, real hull panel, tail and headlights, hull storage box cover, return rollers and some smaller fittings. It may be worth mentioning that parts not meant to be used in this kit are not listed anywhere in instructions, and may confuse some modelers.
The E sprue contains parts for mine clearing blade (mine plow). Parts on this sprue show striking similarities to MCB parts from old Tamiya M1A1 model, on which were most likely based, although they are differences. The biggest difference is the way the two large skates are molded. In Trumpeter kits they are split in two parts with separate tips - this will most likely produce irregular and difficult to remove seam between them... As mentioned earlier there are some ugly ejector pin marks on some MCB parts, which will require taking care of. In addition to plastic parts for the MCB we also get a length of brass chain, copper wire and vinyl tubing. Vinyl tubing is meant to represent the electrical cable, but is much too thick. Also the instructions show the cable routed through the driver's hatch to the inside of the vehicle, what is wrong for M1 Panther II. This vehicle, just like M1A2 tanks, has an electrical junction box added on the outside of the hull, next to the driver's hatch. The part representing (not very accurately) this box is included in the model, but Trumpeter designers obviously had no idea how to use it. The copper cable is supposed to represent emergency release cables, but again is too thick. The brass chain for both MCB and MCR looks more like a jewelry piece with its twisted links and does not resemble a heavy duty chain used on the real thing much.
Sprue H contains mine roller parts. This is quite complex device and there is a lot of parts on this big sprue. One can only hope that all these parts fit well, as otherwise putting all those small parts together could be a nightmare. If they do fit however, it should build into impressive device!
Sprue I contains the link and length tracks. They are molded in black plastic, not yellow one as in some (all?) of older Trumpeter M1 kits. Magically the plastic color change makes them look better than tracks in old kits, but in fact they are exactly the same. And this means that while they are quite nicely detailed (much better than included one piece vinyl tracks), they still feature odd bumps on inner side of each link. These should be removed - this is easy, but very time consuming job. At least it is at all possible to remove them, while similar bumps present on vinyl tracks are practically impossible to remove...
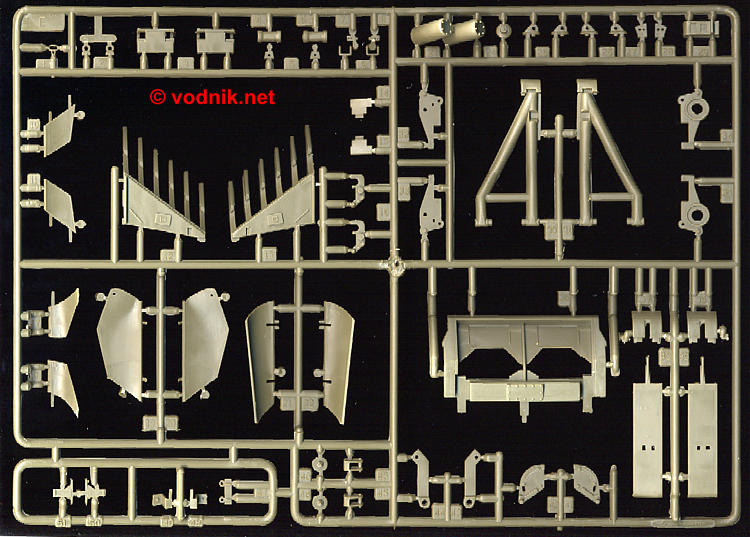
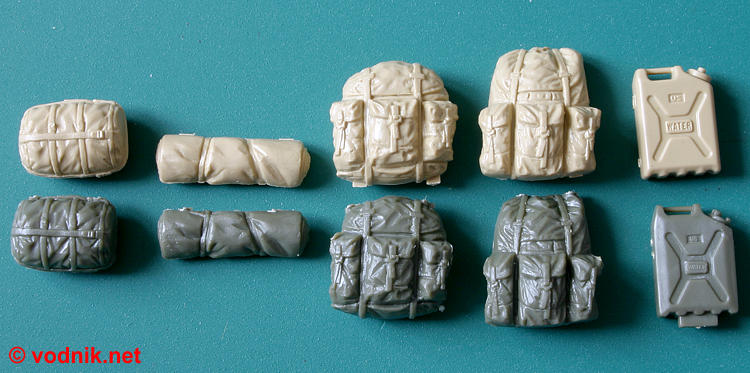
Sprue J is completely new. It contains the turret "plug" with commander's cupola and machine gun, antennas, smoke grenade launchers and some stowage gear. The commander's cupola is quite well done, with separate periscopes, but the inner side of the hatch is very poorly molded with rough uneven surface and three ejector pin marks. Also included on this sprue is engine deck cover, but it lacks the non-slip coating present on the rest of the hull. This is very odd omission, as the engine deck parts in old Trumpeter Abrams kits featured the same coating as the rest of the hull. Hinge details on this new part are however nicer than they were on old part. On this sprue we also get the new larger "dog bone" for MCR (but also used with MCB) - this device is called AMMAD (Ant-Magnetic Mine Activating Device) and is used to detonate the magnetic-fused mines, but also actives tilt-rod-fused mines. Included on this sprue is one part meant to convert the M1A1 hull into the M1IP configuration. This is a second storage box cover. To attach it to the hull, the modeler has to sand off the NBC system covers molded on the hull. It is not particularly difficult, but I can imagine that it might cause some problems to less experienced modelers. One very odd thing is that the plastic type water jerry can has a rectangular plug molded on the bottom and there is a corresponding hole in the turret disc. This means that the jerry can can only be placed in this one location in the storage rack and cannot be easily omitted as a big hole would be left in turret disc - odd idea, as in reality there is no jerry can holder there. I also noticed that stowage items: two ALICE packs, sleeping bad and mat are exact copies of parts from Tamiya "Modern US Equipment Set". Mentioned jerry can is also almost a copy of Tamiya part, with just this plug on the bottom of it added. I thought that days when Trumpeter copied other manufacturer's products are gone, but it looks like they still use their old cheap tricks sometimes...
 |
 |
|
Sprue A. Click on picture to enlarge it. |
Sprue C. Click on picture to enlarge it. |
 |
 |
|
Sprue E. Click on picture to enlarge it. |
Sprue H. Click on picture to enlarge it. |
 |
|
|
Sprue I. Click on picture to enlarge it. |
Sprue J. Click on picture to enlarge it. |
|
|
|
|
Brass chain, copper wire, vinyl tubing and wheel hubs. Click on picture to enlarge it. |
Decals, clear
parts and twine. Click on picture to enlarge it. |
|
|
|
| Hull parts
and vinyl tracks. Click on picture to enlarge it. |
Instruction
booklet. Click on picture to enlarge it. |
THE ACCURACY
The suspension in this model is the same as it was in other Trumpeter M1 kits and while it has separate arms, it lacks several other details such as the track tensioning mechanism on the idler wheel. The details of road and sprocket wheels are also a bit off and leave something to be desired. Sprockets have the mud relief holes, but they are too big and wrong shape. The sponson bottoms are open, just as in all other M1 kits, what is quite visible above the sprocket wheel, particularly when the last side skirt section is left off (what is common practice), so some sheet styrene should be used to close them.
I wrote earlier that M1 Panther II mine clearing vehicle is based on the M1IP hull, not on later M1A1 hull. The Trumpeter model however is based on parts from their earlier kits and this means that M1A1 hull is used. One of the most noticeable differences between M1IP and M1A1 hulls is the addition of NBC system to the latter one. I mentioned above that Trumpeter included a storage box cover, which on M1IP hulls occupied the place later used for NBC system, but the installation of this part requires the removal of molded-on NBC covers from the upper hull. Oddly enough the Trumpeter kit instructions show to install the side NBC panel to the hull. This is an obvious error and this part should be omitted, but instead a round hole for the personnel heater exhaust should be drilled in the hull side.
The lack of NBC system however is not the only difference between M1IP and M1A1 hulls and Trumpeter failed to notice or ignored all the others. While they made a new part for the engine deck cover, they kept the two small inspection hatches on it. It is another error, as there are no such hatches on M1IP engine deck. The two separate front fenders feature X-shaped stamping - again these are not there on M1IP fenders. The headlight guards in the kit are not correct for the M1IP hull either, as these older tanks had simpler flat guards. The cutout for the external extinguisher handle on the left side of the hull is in the wrong (for M1IP) place in Trumpeter model - in M1IP hull it should be about two feet farther forward (approximately 15mm in 1/35 scale). Finally one small incorrect feature is the angle at which the left fuel filler cap cover (near the driver's hatch) is molded on the hull. In M1IP hull the hinge-to-handle axis of the left cover should be parallel to the vehicle side. In the model it is molded correctly for the M1A1 hull and this means at the 45 degrees angle to the tank side. The fuel filler cap covers lack surface details found on real things.
One more difference between the M1A1 hull and M1IP hull is the type of non-slip coating. The non-slip surfaces on the Trumpeter hull part look very well for the late very rough coating type applied to M1A1HC tanks. But earlier tanks, including M1IP had more smooth and irregular coating applied with hand brush. This is not a big problem, but modelers looking for ultimate accuracy should tone down the rough surfaces of Trumpeter hull. Of course the engine deck part will require adding some kind of non-slip coating omitted by Trumpeter.
There are also some other minor inaccuracies in Trumpeter hull - to find out more about them check my M1 kits comparison article here: http://vodnik2.republika.pl/pages/m1-comparison/m1comp1.htm.
The MCB and MCR parts are very complex (particularly the MCR!) and difficult to judge accuracy-wise while still on sprues. I noticed some missing and simplified details and weld lines, but what effect it may have on the general appearance of these devices can only be seen after assembly. I already mentioned that chain, wire and tubing included in the kit are not quite accurate and instructions show the tubing imitating the electrical cable installed in the wrong place. The armored junction box to which the cable should be connected is included in the kit, but is very simplified and not quite accurate in shape. There should be also another smaller rectangular box (another electrical junction box) near the right front fender of the Panther II tank - not present in Trumpeter kit.
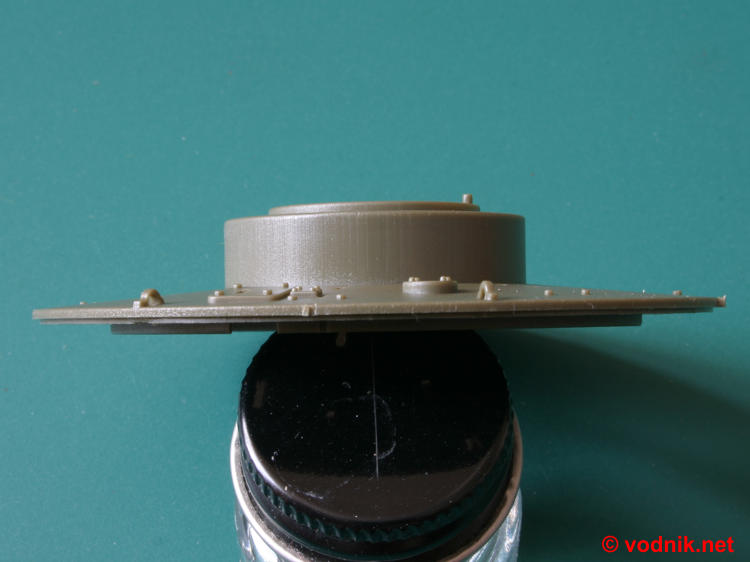
The general layout of large turret ring "plug" part is correct, but it's bottom plate is slightly conical in Trumpeter kit, while in reality it is perfectly flat. There is one small square plate with four bolts missing from the surface of the "plug" part in the kit - it should be in front of the left antenna mount. There are several nice bolt heads correctly represented on the "plug" surface, but a few are missing. For some reason there is a small pin molded under the commander's cupola, which has a corresponding hole on the bottom - this means that the cupola can only be attached in one position and cannot be rotated. It is easy to fix by cutting the pin off.
The smoke grenade launchers are not correct shape, but this is the error repeated in most Abrams models. Only Dragon in their old M1A1 kit tried to make launcher more accurate, but with limited success.
The storage rack rails are molded as symmetrical, but in reality these rails are not quite symmetrical. The bend on the left side of rails should be a bit tighter than the one on the right side. Also the bottom rail is not horizontal on its hole length as in Trumpeter model, but is bent upwards on its left end where it meets the commander's cupola base.
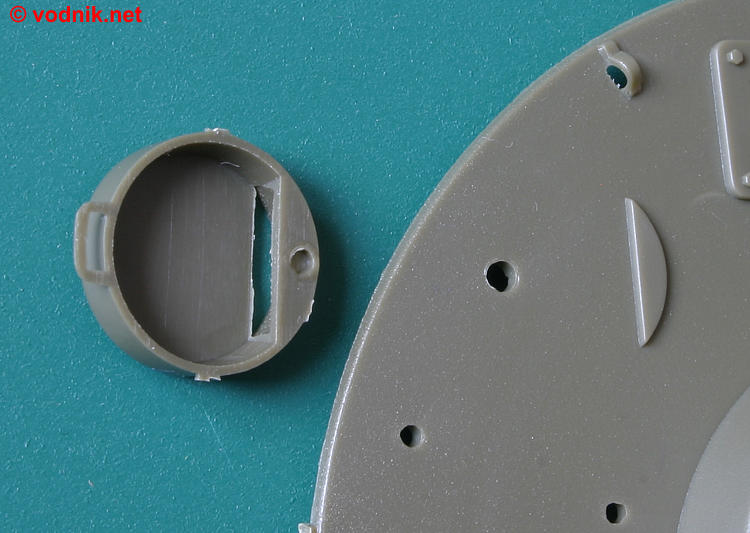
The most ridiculous error made by Trumpeter is the inclusion of part J7 in the kit. This is a circular part with a handle on one side. It is designed to be attached to the turret "plug" and has a pin on the bottom matching the hole in the "plug" base plate. There is also a crescent shaped protrusion molded on the turret "plug" surface with corresponding hole in the bottom of part J7. The problem is that there is no such thing as part J7 on the real vehicle! There is just a flat steel surface there. The source of this strange part becomes obvious after watching some of Ralph Zwilling's photographs of Panther II in Tankograd Militaer Fahrzeug (1/2003) magazine (also reprinted later in Concord's Assault Vol.8 magazine). On several photos there visible is a big flat plastic can / pan used to put under the vehicle to catch leaking oil, which the crew of the tank put there to keep some stuff inside. It is definitely not a part of the tank! It is a nice detail part to have, but it should not be attached permanently to the vehicle... Photos published in Tankograd magazine were obviously used by Trumpeter as their main references. Decals in this kit actually also portray this exact tank as shown on photographs. And even the plastic water can in the storage rack is shown on Ralph's photographs in exactly the same place as Trumpeter put it in their model. I'm quite sure however that the real jerry can was not bolted or glued to the metal surface underneath though ;-)
 |
 |
|
Upper hull part. The NBC panels have to be removed. The cut-out for fire extinguisher handle is in the wrong place for M1IP hull. Click on picture to enlarge it. |
The inspection hatches should not be there on M1IP hull part. Note the lack of non-slip coating visible on the hull part on previous picture. Click on picture to enlarge it. |
 |
 |
|
Road wheel with vinyl hub. Click on picture to enlarge it. |
Poorly molded
details on the sprocket wheel. Click on picture to enlarge it. |
 |
 |
|
The bottom plate of the turret "plug" should be flat, not conical like Trumpeter part. Click on picture to enlarge it. |
The oil pan
is nice part to have, but it is not part of the tank! Click on picture to enlarge it. |
 |
 |
| The bottom of
commander's hatch. Click on picture to enlarge it. |
Tan Tamiya
parts on top, green Trumpeter parts below. Click on picture to enlarge it. |
FINAL VERDICT
For those modelers who don't care for accuracy very much I can say that the Trumpeter model should look like M1 Panther II model once assembled and with the complex mine roller assembly should look quite impressive. It seems very buildable, although I cannot comment on the fit of parts now. Those of you however who want an accurate replica of this mine clearing tank must be prepared for a lot of work. All errors are correctable, most are actually very easy to fix, but good references are necessary and these are not easy to find. Probably the best references at the moment are mentioned earlier Concord's Assault magazine volume 8 and Tankograd Militaer Fahrzeug magazine volume 1/2003, both with excellent photos by Ralph Zwilling. In the end probably the worst parts in the kit are wheels - there is no way to make them look good, other than replacing them with wheels from some other Abrams model.
It remains to be seen how the Dragon kit of M1 Panther II will look like, but the fact that Ralph Zwilling is involved in its designing process gives hope for more accurate model. Right now Trumpeter kit is the only choice for those who don't want to wait for Dragon product and luckily it is not entirely bad product, although it is rather far from perfect.
![]()
![]()
Copyright © 2005 VODNIK, mailto:pawel@vodnik.net